Showing posts with label dollarama. Show all posts

Thursday, November 12, 2015

Super late Halloween decor post

While falling down a youtube hole around Halloween last year, I came across this video for this fantastically creepy and classy Halloween decor DIY by Karen Kavett on HGTV Handmade.


I actually went out the next day to get the wreath and as many cheap snakes as I could find.... which turned out to be not much, despite being Halloween season. The craft store only had big expensive ones, and dollarama (the great mecca for plastic, not always 100% anatomically correct animals) only had these weird, jelly snakes that smelled awful. I know buying them online is an option, but the lack of instant gratification of finding more snakes and the usual DIY project procrastination resulted in the parts I had collected being put away for an entire year and ignored.

If a new bid to try and actually do some half done/not done projects to clean up the stashes, I started looking for snakes again this year! I trip to Honest Ed's while killing time one afternoon got a few medium sized ones and the craft store had a multi pack of snakes that nicely rounded out my pile.


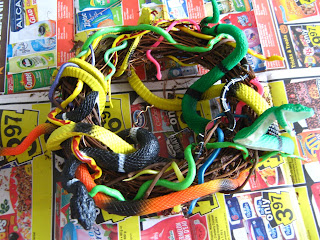
Snakey bits!More Snakey bits!

All you need is a vine wreath, a 'knot' of snakes and some spray paint.


Step 1) Arrange ALL THE THINGS. I went with Karen's advice and started with the bigger guys and filled out the bare spots with the medium and smaller snakes. With Netflix on in the background, weave all the snakes together and arrange until you're happy with how they're looking. I ended up with a few heads sticking out, which gives it personality.
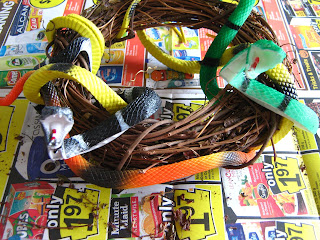
They've got a good dentist, clearly.
Hey dude!
Getting there
Getting there.
Hawt
No actual snakes were harmed in the making of this wreath. Well maybe, I don't know if the hot glue gun ran one over on the way to the craft store. That would suck if it did, but I can't be held responsible for that.
Hot glue certainly helps, and thankfully didn't melt my jelly snakes (which don't smell nearly as bad a year later!)

Step 2) My wreath didn't have a hanger on the back, but some stiff wire from the stash and a healthy application of hot glue solved that problem.

Wirey


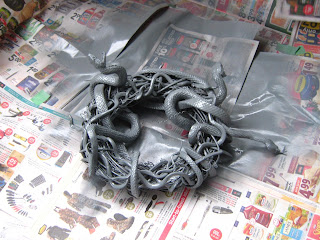
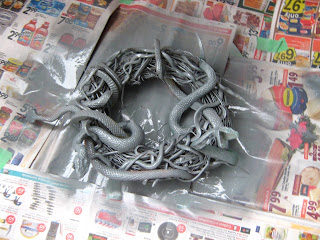
Step 3) After you prepare a spray painting area so as to not ruin your balcony floor and panels, spray paint the crap out of the entire wreath. Make sure you move it around and get it from all angles, and try to get a second coat to make sure you have good coverage everywhere. Let it dry for a good few hours if you can, but it will smell like paint for a while... and maybe make half of your apartment hallway smell like spray paint. Maybe.
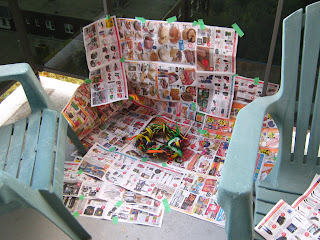
It could be worse. Keeping the damage deposit intact here people.
My super sexy spray paint set up. It's outdoors with good ventilation, stop judging.
Ooo, pretty colours
Before....
Getting there....
During/First pass... 
Just a little more...
Almost there...
Step 4) Hang it up and creep people out!

Done-sky!
"Why did it have to be snakes?" Because snakes are awesome Dr. Jones. Suck it. Also, the lighting in my hallway sucks balls.
I am super pleased with how this turned out. Having it the one colour makes it kinda subtle, as much as a wreath of snakes can be, and it's creepy enough to be outside the spoopy range for Halloween. Also, this turned out to be the only thing I did for Halloween at home, so an afternoon well spent. I know I used a 50% off coupon on the spray paint, and I might have for the wreath last year, I don't remember, but I think I spent about $35 in total for the whole thing, which ain't bad for something I can creep out guests with for years to come :)

My "why I didn't 'do' Halloween this year" post will be coming up shortly, with a nice little Halloween Easter egg, and here's a bad snake pun to tide you all over.

Tuesday, April 23, 2013

Animal print "duct tape" box!

This post could also be titled "Another reason why Dollarama is awesome." Or, "feeding craft addictions since 1992."

Several weeks ago while trolling through my usual list of blogs, and came across this wonderful cardboard box decor tutorial from How Joyful.
 Joy's boxes are custom jobs with some pretty fabulous wrapping paper she found. Love the labels too!

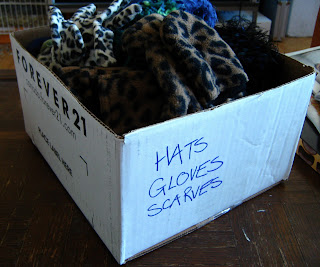
Last week I was wandering through Dollarama ad found some "duct tape" in a Zebra ish pattern. I use the quotes since I'm relatively certain it's not real duct tape from the brand. And I say Zebra ish since it's stripey but not quite like a Zebra. Whatever. I bought a roll of it and decided to spruce up my winter accessories box in the coat closet.
Our very utilitarian front hall coat closet. Yep. The jean machine bag is holding my roommate's two gerbil balls that try to escape frequently.

 Step 1: Find some awesome tape at Dollarama and a box that needs a make over.

 Step 2: Start taping. Depending on your design, you can line it up to continue the pattern. I did the front and both sides and left the back uncovered. I figured the other three sides were more likely to be seen in the long run.

Step 3: Run out of tape as you get to the last row that needs to be done. My previous self saw this coming since the roll was pretty thin, but for some reason, did not buy a second roll.

Step 4: After returning to Dollarama to discover that they have run out of the design you're using and won't be getting more for another two weeks, pick up one of the two neon rolls that are left. Using this as a complimentary colour (like you had planned all along), do the top roll of the box. The neon is a bit see-through, and even with two layers you can still see thick black lettering through it. No matter, since that will be on the sides. Also, use your previous gift wrapping job experience to make the corner fold nicely to look flat and neat.

 SHABAM! Leopard and Neon winter accessories box. 
If you look closely you can see where the tape meets, but I don't think it affects the overall pattern.

Looks nice eh? It's something a little fabulous in the closet.


Saturday, April 13, 2013

March, early April recap. And a floral crown tutorial

I really need to work on this blog writing thing.

First of all, the floral crown! It's finished! And here are the crappy photos of the build and finished product!

Step 1:
Try to clean your room, and then get board and insist on going for a walk to Dollarama to get some fresh air and some exercise. While there, be inspired and gather your materials.
-6 pack of plastic head bands (multi-coloured no less, black, brown and "blond"),
-Green ribbon, and
-Pack of stick-on paper flowers.
-Have a glue gun and sticks already.

Step 2:
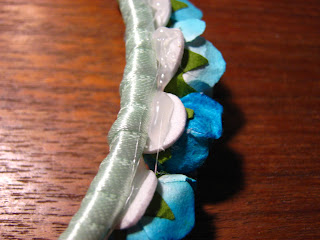
Using your glue gun (badly in my case), wrap your ribbon around the head band. You can either glue and secure as you go along the entire head band, or just mega glue the bottom ends like I do. I found that if you wrap the ribbon tightly, it didn't shift or move once finished.
Pro-tip--> Keep a lighter handy, and burn the edges of cut ribbon to seal them and stop fraying. Burn carefully, they will melt a bit.


Step 3:
Start hot gluing those puppies on! I recommend picking a "front" of the head band, and face the flowers towards that direction. Try to get them fairly close together, or not. Whichever you'd prefer for your crown. There were some instances when the flower became detached from the foam sticky base it was on, so I just added more hot glue. It got a little messy back there, but this will be fixed momentarily.


 Step 4:
Time to cover up that mess in the back. Hot glue ribbon over the foam sticky pads of the flowers. This will cover the mess and further strengthen the flowers on the head band.  I used smaller pieces of ribbon with slits cut in the bottom half to fold over themselves. This, in theory, creates a curve in the ribbon and will allow it to sit a little flatter. I'm sure you can attempt to do this with one piece of ribbon instead of many.


Step 5:
Wear it. Try to fiddle around with strange backgrounds, like an art poster purchase from the Montreal Museum of Fine Arts almost 4 years ago. Also, attempt to actually wear outside the apartment.

There are several floral crown tutorials out there, I know. Lana Del Ray bringing the trend back, along with the summer festival season last year has cemented the floral crown in the young'uns' wardrobe. To add to the repertoire of links to check out, may I recommend,
Mr Kate's DIY fabric floral headpiece tutorial,

Threadbanger's DIY Frida inspired floral crown tutorial (They're back!!! Soooo excited) (one could argue that my crown's construction is very much based on this tutorial),

and of course, the lovely and wonderful, Aunt Peaches's tutorial for a coffee filter fascinator. Yep.


As some of you may remember, I mentioned that I was going to New York City soon. Well, that was last weekend, and it was awesome. It was great to see some of my old classmates, and we got some amazing tours of the New York Public Library's collection of photographs, and the Museum of Modern Art's preservation facility. I also only took two pictures the entire time I was there. Quite pathetic in comparison to the first time I went to New York really, but what can you do? Here they are, by the way.
 Breakfast, at the New York Public Library near Brant Park.
It was pretty awesome. It helped that is was a balmy 15 degrees in NYC, and not the 0 with ice pellets we seem to have in the Tdot at the moment.

I actually have some material for upcoming posts since I'm broke and am saving money by cooking my own meals, some of which in bulk.

Monday, February 25, 2013

102nd post!

Clearly I was paying attention to post count lately and 100 is just too common of a celebratory number for blogger. So, 102 it is!

That being said of course, this post will be remarkably similar to most of my previous ones. To pretend to celebrate though, I am going to start off by showing some work by Laurent Craste, a maker in many mediums whose works I have just discovered and now adore.

All of these pieces are part of his "Abuse" line, and according to a recent interview of him by Dirty Magazine he says that he had "always been fascinated by the phenomenon of vandalism, especially the ransacking phases that accompany revolutionary insurrections, when the works of art are destroyed because they incarnate an ideology, or symbolize a specific social class... and at the same time I am also totally fascinated by the destructive impulse, the violent nihilistic action." I'm looking forward to my next trip to Montreal where I can hopefully see his work in person.

Otherwise, I've been on a Dollarama kick lately, and I've slowly been collecting pieces to try and updo my hideous dining room chandelier. In a perfect world I 'd like to get it to look like the one from Urban Outfitters that I was coveting last year, and that don't have anymore. Just as well, couldn't afford it anyway. So far, I think I've got most of the dangley bits, mostly from the craft section of Dollarama, of all places. I need to work on the center and the dishes around the "candles." Apparently they are actually called "Bobeches," and I think if I find some glass ones, they can be painted in glass paint to retain that see through look. Ideas a plenty!

Sexy colour explosion.

More ice rink action! Since my friends and I could never afford to go to a Leafs game (and I'm a Habs fan anyways), we took advantage of a recent Leafs viewing party hosted by the ACC here in the Tdot. The leafs were actually playing in and against Ottawa, one of my other home towns, so we watched the game live on the jumbotron. My friend was super excited about watching a Leafs game at the ACC, despite the fact we weren't really, and tried to sit at ice level. We threatened him with our chiropractor bills for the busted neck we'd have from staring up at the screen all night, and we took pictures at ice level instead before moving further up to much better seats.


Yep, he's excited.

Sadly, about 20 seconds after I said "looks like we'll have some overtime tonight" to my friends, Ottawa scored in the last minute of play and won. Montreal won against the Islanders that night, so I'm happy regardless.