The weather was beautiful over the weekend, and I was lucky enough to stop doing homework long enough to go outside and enjoy the annual Word on the Street festival downtown. Books galore, magazines and organizations come out and give great discounts, author meet & greets and demonstrations. This year there was a cooking section, sponsored by the Cookbook store, and Mark McEwan did a demonstration to promote his new cookbook and restaurant, Fabbrica.
He made some of his mushroom crustini that is in the book, and served at the restaurant. The spread of Gorgonzola and Marscapone was melting like butter under the herbed grilled mushrooms. I should have fought off the other people and had more.
He also signed my roommate's book. The picture is awful, but he was very nice and personable, answering our questions about Top Chef and when the new season was coming out. We like our food porn in this house.
Sunday, September 25, 2011
Sunday, September 18, 2011
Our balcony has been opened up for renovations... quite a bit. The view has been opened up as well, so long as you don't mind seeing it from the bolted screen door.
This past week was my last chance to use the balcony before it got shut down for the reno, so I decided to move myself and my tea outside for a craft project I had seen on Re-nest a while ago; tin can luminaries!
Here's what you'll need:
• Empty vegetable pet food or soup cans, cleaned out and labels removed
• Water
• Nail
• Hammer
• Scrap paper
• Ruler
• Tape
• Spray paint (optional)
Instructions:
1. Pour water into the empty cans and place them in the freezer. (Don't fill the cans all the way to the top, since water does expand when freezing! Leave some room!)
2. While the water is freezing, draw the design you want on the scrap paper. You can also use simple clip art.
3. Once the water in the cans is fully frozen, you can tape your designs to the can.
4. Use the hammer and nail to punch holes along the lines of your pattern.
5. Once finished with your pattern, you can spray paint the cans or leave them unpainted. The last step is to place a candle inside and, voila! you have your first luminary.
I free-handed the designs, working with the dips and ridges of my soup cans. I think it helped me keep some symmetry for my decidedly straight designs. I also took a folded towel, draped it in between my knees and cradled the tin can in the towel. I found that this really steadied the can and insulated my knees from the cold and gradually melting water. One of my cans also expanded and split from the ice. Another stretched out the bottom. The first issue can be ignored as another area for light to go through, the second problem can be hammered out until flat again.
Mind that first step...
Here's what you'll need:
• Empty vegetable pet food or soup cans, cleaned out and labels removed
• Water
• Nail
• Hammer
• Scrap paper
• Ruler
• Tape
• Spray paint (optional)
Instructions:
1. Pour water into the empty cans and place them in the freezer. (Don't fill the cans all the way to the top, since water does expand when freezing! Leave some room!)
2. While the water is freezing, draw the design you want on the scrap paper. You can also use simple clip art.
3. Once the water in the cans is fully frozen, you can tape your designs to the can.
Note the towel.
Hammer time!
Not bad eh?
I free-handed the designs, working with the dips and ridges of my soup cans. I think it helped me keep some symmetry for my decidedly straight designs. I also took a folded towel, draped it in between my knees and cradled the tin can in the towel. I found that this really steadied the can and insulated my knees from the cold and gradually melting water. One of my cans also expanded and split from the ice. Another stretched out the bottom. The first issue can be ignored as another area for light to go through, the second problem can be hammered out until flat again.
That's the split I was talking about... it let's light out of the back of it, that's my excuse.
Tuesday, September 13, 2011
Pie before Class
I started class today, and to celebrate (dash put off the thought over the weekend), I made some peach pie on Saturday! I have always had issues which pastry, and have had some major pie disasters over the years, so prior to starting I called my mom and got a few extra tips on her recipe that I've been trying to use. I think my chief improvement was to put the dough in the fridge while I was working on the fruit since my kitchen is hot and humid at the best of times. Also, much to most people's taking issue with, I use real lard, not Crisco. Hate the stuff, real lard is the only way to go.
Fruit Pies
Pastry
2 cups of all purpose flour
1 tsp of baking powder
1 tsp of sugar
1 tsp of salt
-Combine all these dry ingredients in large bowl and mix well.
-Add 1/2 pound of lard (half of the box), and cut it in with two butter knives. Flake with hands until crumbly.
-Mix 1 egg with 1/2 cup of cold water, and dribble small portions onto dough until it starts to stick and can be formed into a ball.
-Place dough unto saran wrap, cover and place in fridge for the meantime.
Filling
4 cups of fresh fruit, sliced/cut
1/4 flour (less)
1/2 - 3/4 cup of sugar
Combine the above ingredients in another bowl and toss to combine.
Some assembly required
-Remove dough from fridge and divide in half.
-On floured surface with floured rolling pin, flatten and roll dough to an even, less than 1/2 a cm thick area big enough to cover the pie plate (I use a wonderful pyrex pie, casserole dish, screw aluminum). I've been able to take a floured butter knife and slide it under part of the dough to loosen it from the counter, at which point I can stick it to the rolling pin a bit and roll it around the rolling pin. It sometimes makes it easier to transport the dough to the pie plate 4 inches away. For the first time ever I was able to get both the bottom and top pieces of the pie unto the damned plate in one piece.
-Once the bottom layer of the dough is in the plate, add the fruit filling, spreading to create an even layer.
-Add top layer of dough. Pinch the edge to seal. Cut vent holes throughout the top layer in a desired design. In my case, a squirrel. I happened to have a squirrel cooking cutter lying around in my kitchen drawers, and figured it would help bring in the fall.
-Bake in a 425 degree oven for 10-15 minutes. At the 10-15 minute mark, turn the pie around and reduce temperature to 375, cook for another 20-35 minutes.
*Pies can bubble over and leave filling all over the oven that burns and smells awful. To avoid this, have a pizza pan or cookie try in the oven while the oven is preheating, and place the pie plate on this. The preheat will allow the heat to distribute evenly and protect your oven's floor from burning peaches.
-Keep half an eye on it has it bakes; it will be done as the upper crust turns a light shade of brown around the edges and the exposed filling in the vent holes bubbles.
-Remove from oven, allow to cool for at least 15 minutes prior to cutting and eating. The first few pieces will disintegrate entirely when being removed from the pie plate, but that's just a sign of a pie well done. When fully cooled, slices come out in one piece, ish.
Fruit Pies
Pastry
2 cups of all purpose flour
1 tsp of baking powder
1 tsp of sugar
1 tsp of salt
-Combine all these dry ingredients in large bowl and mix well.
-Add 1/2 pound of lard (half of the box), and cut it in with two butter knives. Flake with hands until crumbly.
-Mix 1 egg with 1/2 cup of cold water, and dribble small portions onto dough until it starts to stick and can be formed into a ball.
-Place dough unto saran wrap, cover and place in fridge for the meantime.
Filling
4 cups of fresh fruit, sliced/cut
1/4 flour (less)
1/2 - 3/4 cup of sugar
Combine the above ingredients in another bowl and toss to combine.
Some assembly required
-Remove dough from fridge and divide in half.
-On floured surface with floured rolling pin, flatten and roll dough to an even, less than 1/2 a cm thick area big enough to cover the pie plate (I use a wonderful pyrex pie, casserole dish, screw aluminum). I've been able to take a floured butter knife and slide it under part of the dough to loosen it from the counter, at which point I can stick it to the rolling pin a bit and roll it around the rolling pin. It sometimes makes it easier to transport the dough to the pie plate 4 inches away. For the first time ever I was able to get both the bottom and top pieces of the pie unto the damned plate in one piece.
-Once the bottom layer of the dough is in the plate, add the fruit filling, spreading to create an even layer.
-Add top layer of dough. Pinch the edge to seal. Cut vent holes throughout the top layer in a desired design. In my case, a squirrel. I happened to have a squirrel cooking cutter lying around in my kitchen drawers, and figured it would help bring in the fall.
-Bake in a 425 degree oven for 10-15 minutes. At the 10-15 minute mark, turn the pie around and reduce temperature to 375, cook for another 20-35 minutes.
*Pies can bubble over and leave filling all over the oven that burns and smells awful. To avoid this, have a pizza pan or cookie try in the oven while the oven is preheating, and place the pie plate on this. The preheat will allow the heat to distribute evenly and protect your oven's floor from burning peaches.
-Keep half an eye on it has it bakes; it will be done as the upper crust turns a light shade of brown around the edges and the exposed filling in the vent holes bubbles.
-Remove from oven, allow to cool for at least 15 minutes prior to cutting and eating. The first few pieces will disintegrate entirely when being removed from the pie plate, but that's just a sign of a pie well done. When fully cooled, slices come out in one piece, ish.
Saturday, September 3, 2011
And we're back
Back from Vancouver!!
I know it's been a while since I last posted, but August has been a bit crazy at the best of times. Paris journal is done, internship is done and had a nice vacation to boot. And now for the food!
As soon as we hit Vancouver, after an amazing, well fed train ride from Toronto, my friend and I started scoping out the many food carts that pepper the streets of downtown. Each was awesome.
Our second visit was to Japadog, and we actually ended up going twice. The first time we split a Negimiso dog, made of Turkey wish miso sauce, green onions and Japanese mayo. It was unbelievably good. I'll leave it at that. The second time we tried their signature dog, the Terimayo which had teriyaki sauce and seaweed. Equally, unbelievably good. They have four carts sprinkled around town right now and are planning to open one in New York City in November of this year. If we go on the school trip again, I know where we're eating!
Japadog's Negimiso dog.
Our third visit was to the Roaming Dragon cart, which sadly wasn't operating on their regular menu since they were at the PNE when we came by. That being said, the Dragon Clubs we had weren't bad, way too much daikon and cilantro though. Lemongrass chicken makes for a great club sandwich!
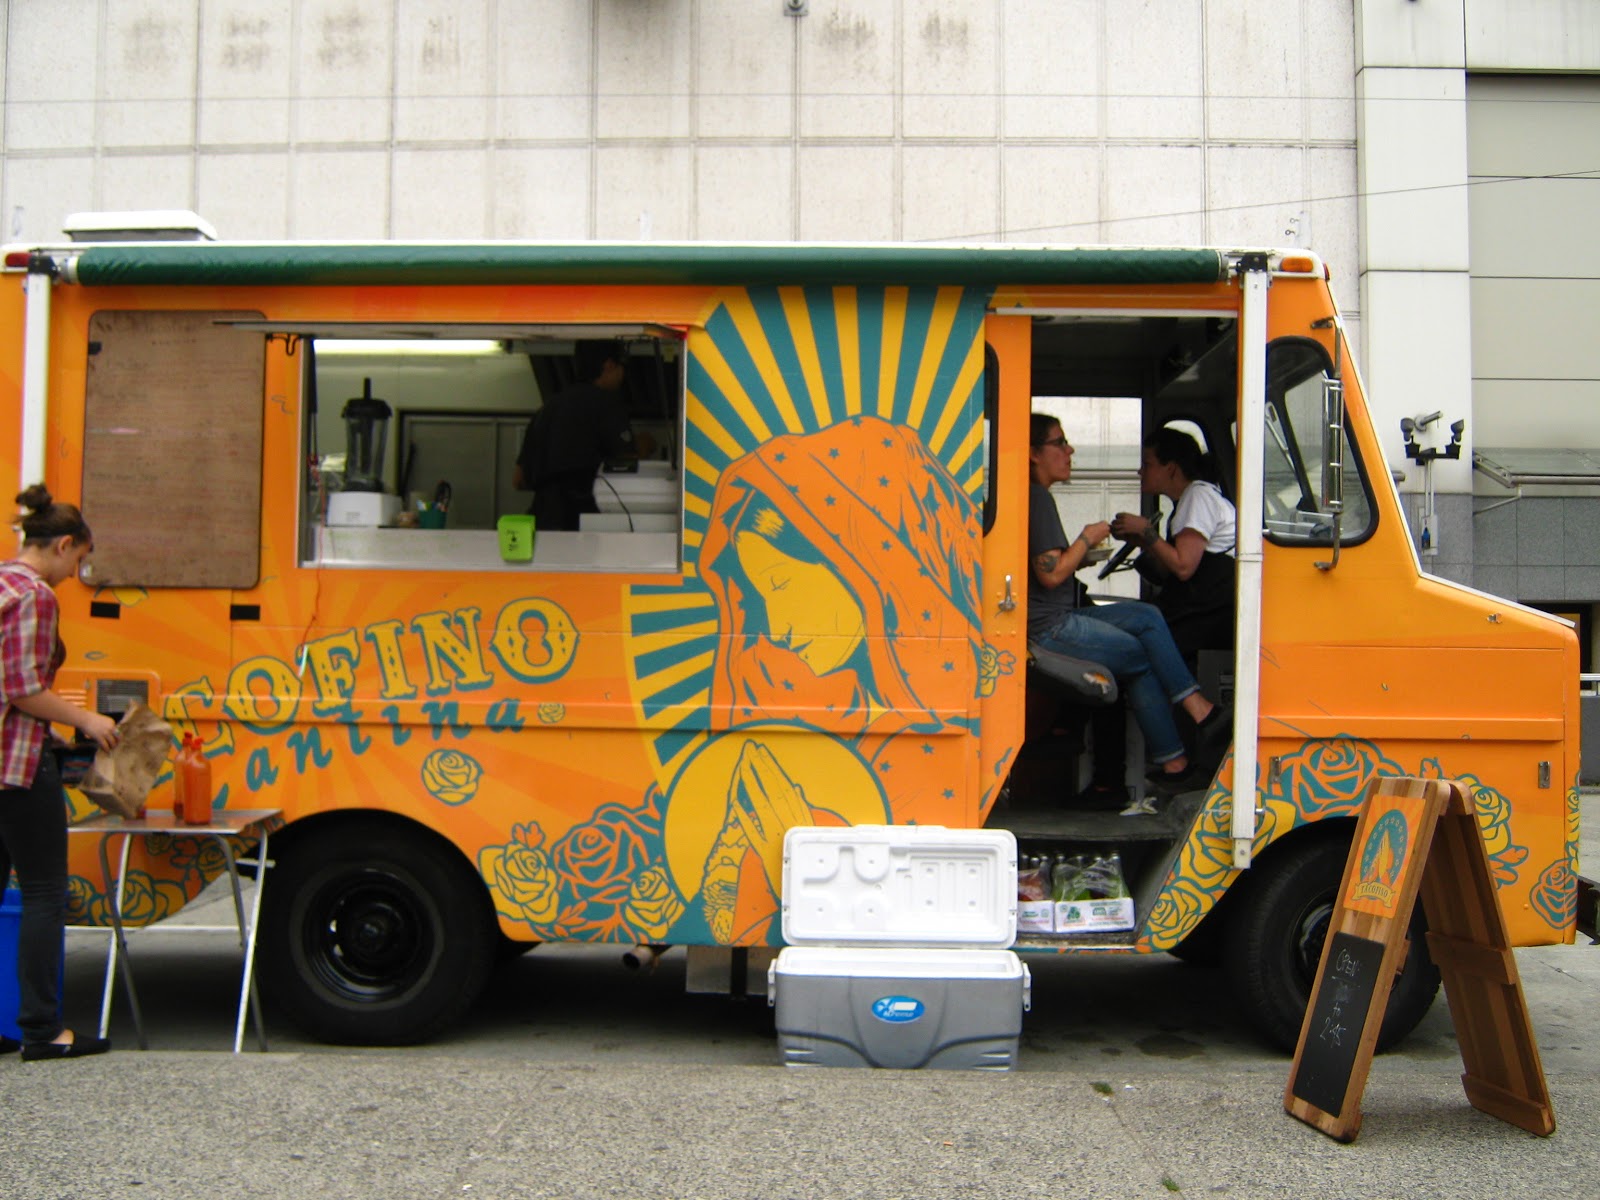
Our final cart was one that was recommended many times to us by Steve, our tour guide for our two Tourguys tours that we took (we didn't have time for the 'eat your cart out' tour, we did the Gastown and downtown tours. Check 'em out, they're awesome too!). A cart originally out of Tofino B.C., the Tacofino truck was by far our favorite. We both got the fish taco, which featured tempura battered cod with chipotle mayo, cabbage and salsa fresca on a flour tortilla. Holy things I shouldn't say in public, it was good. If you do nothing else in Vancouver, go to this cart, and order the fish taco. Preferably lots of them. These guys take locally and recently caught fish directly from the government docks in Vancouver and make these things from scratch, and you can taste the amazingness that goes into them.
Strictly speaking this last one isn't a cart, it's a full blown restaurant, but the lunch we had is very much worthy of written recognition. The Sandbar on Granville Island offers quite the menu, but after splitting a Tuscan flat bread with onions and goat cheese, my friend and I got the same order, the island club. Shrimp and Dungeness Crab salad come together with Bacon and Guacamole to create one hell of a sandwich. The fries were suspiciously like those one can get from a McCains bag, but still good, and the sandwich more than made up for it. It was one of the last things we did on the tip, and now that I'm back home, broke and about to start school again, it was good way to end the summer. Let fall begin with food!
As a side note to this post, the first three carts have had their photographs taken by my good friend Rob. I was too busy eating to bother, so I stole his photos for here. I am crediting him of course, so check out his Flickr feed: infectedroot
Tacofino and Sandbar are my photos, I finally remembered to take the pictures before eating the food.
I know it's been a while since I last posted, but August has been a bit crazy at the best of times. Paris journal is done, internship is done and had a nice vacation to boot. And now for the food!
As soon as we hit Vancouver, after an amazing, well fed train ride from Toronto, my friend and I started scoping out the many food carts that pepper the streets of downtown. Each was awesome.
Kaboom Box!
The first was Kaboom Box, out on Granville street for the weekend pedestrian festivals. This cart focuses on fresh, local fish, sustainable meat and organic veggies for all their menu items. My friend got the kaboom box fish and chips while I had the "world famous hot smoked salmon salmwich."Both were really, really good. My salmwich had home-made maple coleslaw in it, which is normally something I wouldn't go for since I have this condition that makes all coleslaw taste the same: awful, and artificial. This was the cure for that condition, it was so fresh and different, especially with the spicy mayo. The slab of a fish steak certainly helped as well. I also finished my friend's tempura battered fish and chips. Light weight. Hot Smoked Salmon Sandwich!!!
Tempura Battered, Kaboom Box Fish & Chips.
Our second visit was to Japadog, and we actually ended up going twice. The first time we split a Negimiso dog, made of Turkey wish miso sauce, green onions and Japanese mayo. It was unbelievably good. I'll leave it at that. The second time we tried their signature dog, the Terimayo which had teriyaki sauce and seaweed. Equally, unbelievably good. They have four carts sprinkled around town right now and are planning to open one in New York City in November of this year. If we go on the school trip again, I know where we're eating!
Japadog's Negimiso dog.
Our third visit was to the Roaming Dragon cart, which sadly wasn't operating on their regular menu since they were at the PNE when we came by. That being said, the Dragon Clubs we had weren't bad, way too much daikon and cilantro though. Lemongrass chicken makes for a great club sandwich!
Beef Dragon Club.
Our final cart was one that was recommended many times to us by Steve, our tour guide for our two Tourguys tours that we took (we didn't have time for the 'eat your cart out' tour, we did the Gastown and downtown tours. Check 'em out, they're awesome too!). A cart originally out of Tofino B.C., the Tacofino truck was by far our favorite. We both got the fish taco, which featured tempura battered cod with chipotle mayo, cabbage and salsa fresca on a flour tortilla. Holy things I shouldn't say in public, it was good. If you do nothing else in Vancouver, go to this cart, and order the fish taco. Preferably lots of them. These guys take locally and recently caught fish directly from the government docks in Vancouver and make these things from scratch, and you can taste the amazingness that goes into them.
Yep, she's holding a taco.
FISH TACOS!!!
Strictly speaking this last one isn't a cart, it's a full blown restaurant, but the lunch we had is very much worthy of written recognition. The Sandbar on Granville Island offers quite the menu, but after splitting a Tuscan flat bread with onions and goat cheese, my friend and I got the same order, the island club. Shrimp and Dungeness Crab salad come together with Bacon and Guacamole to create one hell of a sandwich. The fries were suspiciously like those one can get from a McCains bag, but still good, and the sandwich more than made up for it. It was one of the last things we did on the tip, and now that I'm back home, broke and about to start school again, it was good way to end the summer. Let fall begin with food!
The Island Club of Amazing!
As a side note to this post, the first three carts have had their photographs taken by my good friend Rob. I was too busy eating to bother, so I stole his photos for here. I am crediting him of course, so check out his Flickr feed: infectedroot
Tacofino and Sandbar are my photos, I finally remembered to take the pictures before eating the food.
Wednesday, August 10, 2011
Summer writing...
What I'd rather be doing.
Picnicing in Paris versus writing about Paris in an academic manner.
What can you do?
Keep on writing. I want to get this done before running away to Vancouver. Especially now that we've lengthened the trip to include an overnight trip to Seattle. Back to writing about the Carnavalet I go.
Monday, August 1, 2011
A variety of things
Happy Civic Holiday! or Simcoe Day! or BC day! and a variety of other names this August long weekend seems to have. It's Simcoe Day where we are. So far as I'm concerned, it's a day to clean this place up.
My apartment's a bit of a disaster. Not even close to one by other people's standards, but both my roommate and I are working long, 9-5 days at the moment, so we haven't swept, vacuumed or put things away with any enthusiasm in a long time. We did get a start on that yesterday, since while I was at a baseball game, she was at ikea with a friend and got some great shelving units for our kitchen and linen closet for more space and organization. Pictures to come.
I've been doing some cooking lately, nothing too exciting though. This week has been very repetitive and boring by way of cuisine. That being said, I have discovered an amazingly easy recipe for dumplings, something I have never made before. This is another Kitchn find, and is so quick and easy to make. I may have to start keeping ricotta in my fridge on a regular basis, since it makes a good quick dinner. It's always a little different each time since I vary the herbs each time too!
My apartment's a bit of a disaster. Not even close to one by other people's standards, but both my roommate and I are working long, 9-5 days at the moment, so we haven't swept, vacuumed or put things away with any enthusiasm in a long time. We did get a start on that yesterday, since while I was at a baseball game, she was at ikea with a friend and got some great shelving units for our kitchen and linen closet for more space and organization. Pictures to come.
I've been doing some cooking lately, nothing too exciting though. This week has been very repetitive and boring by way of cuisine. That being said, I have discovered an amazingly easy recipe for dumplings, something I have never made before. This is another Kitchn find, and is so quick and easy to make. I may have to start keeping ricotta in my fridge on a regular basis, since it makes a good quick dinner. It's always a little different each time since I vary the herbs each time too!
Original recipe here.
Ricotta Dumplings with Chèvre and Herbs!
serves 2 generously as a main dish, or 4 as a side dishIngredients:
1/2 cup part-skim ricotta cheese
2 large eggs
1 1/2 cups flour
3/4 teaspoon salt
Freshly ground black pepper
2 tablespoons of water, as needed
2 tablespoons unsalted butter
Handful fresh herbs (rosemary, flat-leaf parsley, sorrel, mint, thyme, or combination thereof)
2 ounces fresh chèvre
Place a 3-quart (or larger) saucepan of water over high heat. Salt generously and bring to a boil.
While waiting for the water to boil, whisk together the ricotta and eggs. Add the flour, salt, and a sprinkle of fresh black pepper. Mix together quickly and lightly with a spoon. If the dough is too thick and floury, add 1 to 2 tablespoons of water.
Turn the dough out onto a floured countertop and quickly pat it out. (Don't add too much flour; these will be just slightly sticky.) Pat the dough out until it is about 1/2-inch thick, and cut into 1-inch squares. Using a pizza cutter that had been dipped in flour every couple of cuts works really well.
Drop these little squares into the boiling water and cook for 2 to 4 minutes, or until they float to the top and are fully cooked inside. Remove them from the water with a slotted spoon.
Pour the water out of the pan and place back over medium heat. Melt the butter in the pan. While the butter is melting, chop the herbs roughly. When the butter has melted, add the herbs and cook for just a few seconds, stirring them until fragrant. Turn off the heat and add the cooked dumplings back to the pan. Toss with the herbed butter. Add the goat cheese in small dollops and toss.
Serve immediately.
Makes for some great leftover lunch the next day too!
In other news, vacation update! My friend and I were up late a few nights ago and found a great travel deal that was hard to pass up, 75% off is hard to argue with. So, as a result, we're going from Toronto to Vancouver by Train!!!
See that big, long red line? That's us for four days!!
We each got a one-person room which included all of our meals on the trip for a fraction of what the room would normally cost. We're also spending a few days in Vancouver upon arrival and the flying back to Toronto. Back to the homeland I go!
Subscribe to:
Posts (Atom)